Nov 29, 2007

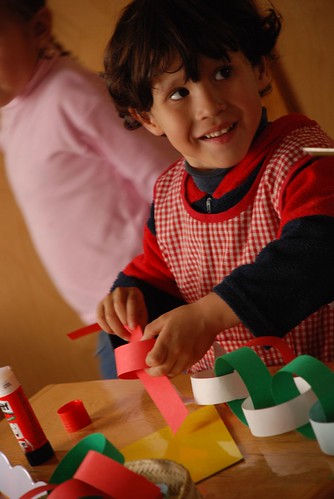
holiday crafting with the wee ones

salt dough ornament

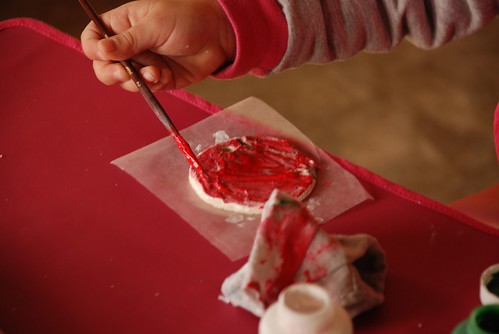
As promised! I'll begin with my personal chart-topper, salt dough ornaments.

Use the play doh recipe and leave out the food coloring. Form a small ball (about 1" diameter) by rolling the dough in your hands. On wax paper, flatten the ball with the palm of your hand and use a small rolling pin to roll out the ornament until it is no less than 1/2 cm thick. With a small wooden dowel (or a pencil with the eraser cut off) make a hole in the top of the ornament. Using acrylic paints (or even washable tempera, which I used due to availability) paint the ornament while it is still soft. Let it air dry on the wax paper overnight, then flip it over and air dry it some more. Two days later, it should be dry enough to finish with a glossy mod podge seal. Attach the ribbon, and ta da! You now have a keepsake ornament for the family collection. (Before the ornament is dry, you might consider "engraving" the date on the back with a toothpick.)

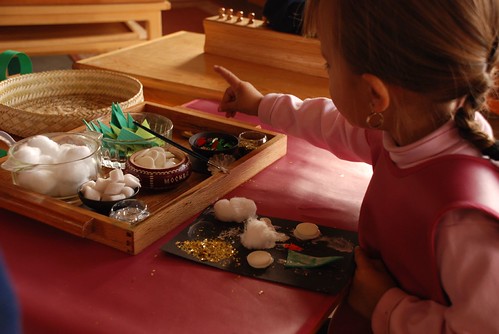
Winter scene collage
Gather all of the white miscellany you can get your hands on - cotton balls, white buttons, styrofoam packing peanuts, soap flakes, white yarn, egg shells, etc. Glue away on a dark card stock background.

Winter scene 3-D collage
Using a scrap of cardboard as the base, go outside and collect sticks and stones, and perhaps a little moss if you're lucky. Using that handy-dandy play doh once again, make a sturdy base in which to place the sticks to make the "trees" stand upright. Go for it with the play doh, glue, and other white items such as the ones suggested above. You might consider providing a bit of glitter to evoke a moon-kissed snowy eve.

This looks awesome, too - though I haven't tried it yet.

Soap Snow
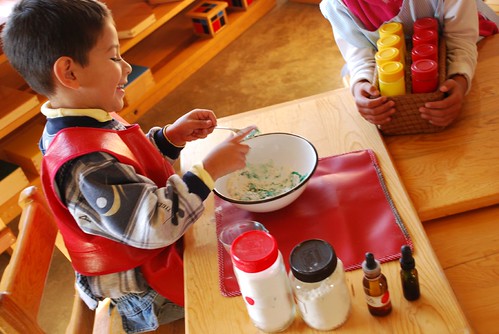
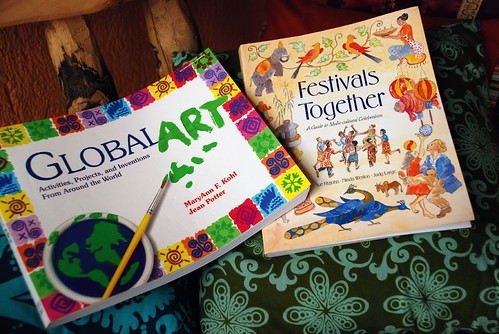
Here's an idea from one of my favorite children's craft books: Global Art.

Measure 1 cup of cold water into a bowl. Little by little, using a hand mixer, add 4 cups of soap flakes (such as Ivory) to the water. Beat the soap and water until just stiff. Put some of the soap mixture into a pastry bag or a sandwich bag with a small hole cut out of the corner to allow the soap to escape. Squeeze soap designs onto cardboard and dry until hard.
*Don't put the mixture down the drain as it will cause a whopper of a clog!*

suggested children's craft goodness

As far as holiday crafting goes, I'm a huge proponent of going the multi-cultural route whenever possible. A family (or classroom) crafting activity becomes that much more meaningful when it is accompanied by stories, food, and music from the region. These two books have been a real boon in this aspect. Festivals Together is a great amalgamation of traditional crafts, activities, songs, stories, and recipes from cultures around the world, arranged by season.

Oh - one more thing - don't forget to visit Bella Dia during the month of December. Cassi will be authoring a daily "activity advent," replete with holiday activities, children's crafting, and cooking!

If you have a children's holiday craft you would like to share, please consider posting a short tutorial in the comments!

:) Meg

Nov 28, 2007

art, craft, children, and the making of the home

salt dough ornament


winter collage

oh my gosh ... he's smiling!

classroom holiday crafts

In my Montessori training, we were warned against putting the children's art up for display. Children's art, it was said, should be spared the ooohs and aaahs adults are so prone to spill all over it. Like any work, it should be received in a kind and encouraging manner, but shouldn't be put on a pedestal, as the goal is for the child to learn to love the process of creating for itself, and not to "create" just because of the accolades their creations tend to elicit from grown-ups.

Okay, so that's the Montessori view of artwork. I'm on the fence - while I certainly don't want my students and future children to create simply because I like it and think its so incredibly cute, I also believe that displaying children's art in the home and classroom is an important act of home making and community building.

First, I would never want to diminish the act of giving a handmade gift that is, by its nature, infused with love, time, and much effort. As a child, I remember giving countless homemade gifts to people I loved. The child's generosity is unencumbered by holiday pressures and financial worries, and his penniless, spontaneous state allows creations of love to be gifted at any time of the year, if only he has within his reach a set of paints, fabric scraps, and other mundane treasures.

Next, if my creations are sprinkled about my home, why shouldn't my children's be, as well? For me, an integral part of "home making" is just that - a home must be made, not bought. How does one make a home? Here are a few thoughts:

Baking and cooking from scratch
Gardening and eating from your seasonal harvest
Making household items, such as towels, pillowcases, quilts, etc., by hand
Thoughtfully decorating with thrifted or handmade items
Cleaning - again and again and again and again ...

A home must be lovingly "acted upon" in order to make it a home. A home can't function on its own - we grown-ups are well aware of this. Children need to be brought into this realm of understanding, too. Remember that post on Practical Life exercises a while back? If you haven't read it yet, go ahead and read it now. As soon as the child is developmentally capable, he should be encouraged to help to "make" the house into a home. Like his parents, he should be involved in meal preparation, cleaning, and decorating; in essence, the child shouldn't be overlooked in the whole, ever-occurring process of making a house into a home.

If you are a crafter, this means that, like you, your children will want to make useful and decorative items for display, as they will see it as a tangible way to contribute to the family community. If you don't consider yourself an artist - consider trying it out, for the sake of your children. Why should their art be the only of its kind on display on the fridge? Consider making items for the home together, and finding more pleasing and permanent ways to display children's artwork other than the fridge. If you're at a loss for where to begin, Amanda's upcoming book promises to have some innovative ideas for displaying children's handiwork and many more lovely ideas for encouraging creativity in the family.

As for the classroom? Well, it wasn't for quaintness that Maria Montessori decided to call the 3-6 year-old classroom the Children's House. It is meant to mimic the family home, from the cozy decor to the familiar household (practical life) activities. I would say, then, that the students in the Montessori classroom should be part of the entire "home making" process, from caring for the plants to decorating for the holidays. No die-cut bulletin boards for our "House." Instead, you will find handmade paper garlands, hand-cut snowflakes, salt-dough ornaments, and more. The children make the decoration and then decide how, where, and if it will be displayed.

More on specific holiday crafts tomorrow!

Nov 26, 2007

the secret joy of giving

christmas tree patchwork
sneak peek of a wonderful someone's gift

'Tis the season of occult crafting. Little snippets of WIPs are shown, but not the project in its full glory, out of fear that the recipient might be lurking around blog land - eager to shake the virtual gift box and discover what might be waiting underneath the tree. ;)

I am a box shaker. Are you? Thus, being naturally on guard against other box shakers, I have several wonderful handmade gifts in the works that I'll be keeping under wraps for the time being.

Meanwhile, I'm busy gathering goodies for the Holiday Traditions Exchange and sewing up little ice skates for the ornament exchange.

And, like many of you, I have pledged to buy handmade this holiday season. This has translated into an inordinate amount of time spent wandering around Etsy. I leave you with some of my favorites:

JCasa's baby quilt

The Wreath Lady
Marmee Craft's Wee Felted Snowmen
Matryoshka wrapping paper
Bombo by littlellama
The Black Apple
Coyote Craft's embroidered cupcake ornaments
AntiGenre
Treehouse 28

Nov 24, 2007

fire up the wood stove

the storm prelude 2
The prelude.

snowy front yard
The snow.

yeah ... um ... that's our wood pile
The wood pile. Oops!

Nov 23, 2007

thanksgiving leftovers

thanksgiving leftovers

The best Thanksgiving leftovers of all time! Come to find out, I'm not the only American- Montessorian expat who enjoyed some Domino's home cookin' instead of turkey. Be still my salivating taste buds.

May I speak frankly about Thanksgiving dinner? I hate to offend, but I must say that I have never, EVER, enjoyed the traditional Thanksgiving meal. First off, my vegetarian sensibilities kicked off at an early age, and I always felt bad for the bird. Second, gravy makes me gag. Third, I SO dreaded the days upon days of really icky cold turkey sandwiches and football games. Umm ... hello, my name is Meg and I'm a Thanksgiving party pooper.

That said, there are some wonderful things about Thanksgiving - family, pumpkin pie, and Martinelli's sparkling apple cider. And the fact that, once Thanksgiving passes, it's gung-ho Christmas decorating time!

So yes, it made us a bit sad yesterday that instead of sipping apple cider with all the fam, we found ourselves in Chihuahua City taking care of my husband's immigration documents. Which, I might add, is just about as fun as spending the day at the DMV. But it all worked out in the end, (no) thanks to American cultural hegemony. For what did we find 8 hours south of the Texas border in the middle of a desert? Domino's pizza! Rock on.

Nov 20, 2007

tour of rural mexico

uriquenov2007 015

uriquenov2007 194

uriquenov2007 113
for more, hop on over to flickr

Fresh-squeezed grapefruit juice. Every morning, afternoon, and evening. That pretty much sums up our weekend getaway to Urique. To tell you the truth, we didn't do much else other than pick, squeeze, and drink grapefruit juice - but that was the whole point! No internet, no crafting, no thinking about anything other than the present moment. We brought our yoga mats, enjoyed our books, and stayed up late talking about a hodge-podge of subjects. Nice.

If you happen to be presented with an opportunity to visit Urique, we highly recommend staying at Entre Amigos. Be warned - you will never want to leave, and will begin making arrangements to retire somewhere nearby.

Thanks to those of you who took advantage of the sale over at my Etsy shop. I am leaving the sale open until Wednesday night, as my sweet Grandma has offered to ship off any extra orders.

Hasta muy pronto,
Meg

Nov 16, 2007

i've embroidered something you might like ...

saleembroidered

35% off over at my etsy store until Monday, November 19th!

My lovely parents (who are in charge of packaging and sending out my patterns) are going on vacation, and won't be back until the second week of December. This means that if you are considering making reading pillows or baby carriers for holiday gifts you should order now so that the patterns arrive with enough sewing-time to spare! I have listed 40 of each pattern at 35 percent off - first come, first serve. My parents will ship your pattern(s) by Tuesday or Wednesday of Thanksgiving week. Then they will go lounge about with nothing to do on a beautiful beach in Hawaii. Poor parents. Let's inundate them with pattern packaging before they leave! ;)

Patrick and I will also be guilty of a totally indulgent, relaxing mini-holiday this weekend. We are headed off to Urique, a tiny town at the bottom of the Copper Canyon. While we live in an alpine climate up here in Creel, Urique is tropical. That means mangoes, cherries, and avocados dripping off the trees. That means shorts. That means ice cream cones, old men playing cards on their front stoops, women fanning themselves as they watch their children play ball in the street. Yes. We'll be back Monday night, completely refreshed. Oh. And ready to prepare shipping labels for 80 patterns!

Thanks for all your support - every pattern purchase is so appreciated, and it brings us one step closer to our goal of being able to have me stay home with our (future) children when they are young. Thank you from the bottom of my heart!

xo,
Meg

Nov 15, 2007

paper clip ice skates

ice skates

wool + embroidery floss + cotton ball + paper clips

I first came across these little bitties during my Montessori training course. It was love at first sight, I tell you! They've been a seasonal staple in my classroom ever since.

You will need to pre-cut the wool or felt "booties" and provide all of the necessary materials, including an easy-to-use needle threader (available at Michael Olaf.) Obviously, this is a rather advanced sewing activity and only children who have mastered the more simple sewing materials should be introduced to the ice skates.

What, you say? You aren't six years old and you still want to make paper clip ice skates as tree ornaments? No matter! I'm already twenty years past my prime, and I'm still as giddy about them as any kindergartener.

Oh ... and, if you are in Group 11 for the holiday ornament swap, don't go making yourself a whole set. Surprise! You're all getting paper clip ice skate ornaments!

xo,
Meg


Nov 12, 2007

holiday traditions exchange is officially closed!

***Update: All of the swap partner emails have been sent out (whew!) If you haven't heard from me, send an email to montessorirevolution(at)gmail.com.***

I will begin sending out swap partner emails tonight, but might not get through the whole list of participants until Wednesday - there are 210 of you, after all!

I must admit - it feels quite odd publishing a post without a picture. This is a self-conscious, naked little post, running hither and thither looking for some pretty photographic foliage with which to cover up. ;)

Have a happy Monday,
Meg

Nov 11, 2007

i wasn't joking

halter holiday apron

I really am holiday obsessed. Here's a halter apron that emerged from the sewing machine today. The fabric is from Reprodepot, but I bought it way back in July, when I stocked up on creative supplies on a visit home to the states.

Speaking of which ... my fabric supply is dwindling. Time to start ordering enough to get me through the next six months. My dear, sweet mummy will be hauling a duffel-full of fabric, books, and patterns when we meet up this Christmas in Roatan, Honduras. Ever been? While I'm partial to snowy holidays, I can't complain. Plus, the whole lot of us will be there - Patrick's parent's and three siblings (one of whom is a Peace Corps volunteer in Honduras,) and my mom and dad. Nothing like killing two families with one stone. Hmm ... perhaps that idiom doesn't quite fit the bill? We are loving children. Really. :)

Posts will be short and sweet this coming week due to my parent-teacher conferences, but you will most certainly be hearing from me by Wednesday with your swap partner info! Swap entries close at midnight tonight.

xo,
Meg

Nov 9, 2007

just a spoonful of nutella helps the mexican food go down

nutella - the real chocolate substitute

What are you in the mood for - Mexican? Thai? Ethiopian? I can't wait until I can ask myself that question without having it prompt a moan. Have you ever tried diversifying your palette with little more than pinto beans and a few pesticide-laden veggies on hand?

Of course, it isn't all bad - I did find this lone jar of Nutella at a local store, which I proceeded to devour like a famished dog. Chocolate is hard to come by. We have, on rare occasion, found a bag of unmarked chocolate chips hiding amongst the tortilla chips. Taking this to be a good sign, we began to ask for chocolate chips when we couldn't find them on the shelves. They had NO clue what we were talking about. The woman at the register actually showed us chicken bouillon and said, "Si, es chocolate." Umm ... okay, so she was crazy. Whatever. The chocolate chips had a vague taste of "been sitting around a Mexican grocery store for 10 years so start to taste like the grocery store" thing about them, anyway.

Most of the time I try to make the best of the situation, but come winter, the prospects get considerable worse if you are a Moosewood snob at heart, like myself. You mean the only vegetables available are carrots, an occasional tomato, and iceberg lettuce? Going grocery shopping can be pretty depressing, let me tell you! Especially when all of you lovely bloggers are constantly raving about a newfound wonder-recipe using all organic ingredients, or posting saliva-producing photos of your latest baking pursuits. Am I the only one who got totally envious when I downloaded Amy's recipe cheat-sheet? Gosh. I'm pretty sure this means that I am due to gain about 278 pounds once I move back to the US and sign up at a local organic co-op.

Just a quick update - I have been receiving so many sign-ups for the Holiday Traditions Exchange that I can no longer respond to each one! Just look for an email from me sometime before Nov. 14th, which will contain your swap partner's information. If you don't hear from me by the 15th, then go ahead shoot me off an email.

P.S. Watch this for a good laugh. It's also perfect for inducing cheese ball lust.

Nov 7, 2007

once upon a time there was a little boy who loved play-doh

making play doh 009

But his teacher thought he was too little to make it himself on the stove ...

making play doh 039

So she put together a special, no-cook play-doh making exercise just for him.

The little boy has never been happier! Every day at school he makes a batch of play-doh to share with the rest of the children on the art shelf and a special green batch to take home.

4 tablespoons of white flour
2 tablespoons of salt
1 dropper-full of vegetable oil
2 tablespoons of water

Add the dry ingredients in a bowl. If you want to add a few drops of food coloring, make sure to add it to the water, otherwise it will be difficult to get a uniform color. Little by little, add the water. At first, stir with a spoon - once all of the water is added, start smooshing the mixture with your hands until it reaches the desired consistency. Store in an air-tight container in the fridge when not in use. Most likely, it will end up drying out after a day or two of heavy use.

Psst ... want to see more recent pics of classroom happenings? I just posted a bunch over at Flickr .

xo,
Meg

Nov 5, 2007

i'm swa(m)ped!

yo-yos

Such good news - I have over 120 wonderful people signed up for the Holiday Traditions Exchange! Keep those sign-ups comin'. This is going to be so much fun! Just a few remarks - if you simply left a comment on the post but didn't email me directly, please go ahead and send me an email. Remember that Blogger doesn't provide me with your email addresses. Also, if you sent me an email to sign up and didn't receive a direct response, know that I received it and you are good to go. The beginning of last week was a bit crazy, so my apologies for not being able to confirm with everyone.

HolidayOrnamentSwap_07

Keeping in the spirit of the season, I wanted to be sure to give you a heads up on this swap, in case you are feeling super festive. Be sure to make your decision soon - sign ups end on Friday, November 9th. I found out about the swap last year while milling about on Flickr, searching for holiday decorating ideas. I was a few weeks too late - and I made a mental note to be on the lookout for it this year. Make 8-10 ornaments, receive 8-10? Sounds like my kind of thing. I would love to (eventually) be able to decorate my tree exclusively with unique, handmade ornaments. White lights (do those eco-friendly LED lights come in white?) and lots of red, green, and aqua.

Yes, I do have a comically full plate - but truth be told, I wouldn't be able to put aside such great swapping opportunities simply in order to hold onto my sanity. Sanity is so overrated. Plus, the act of creating is quite relaxing - unless you are writing a pattern, that is! ;)

In my moments of sheer self-indulgence and utter procrastination, I've been ogling the the following handmade goodies: these aprons by Handmade Hostess; this print by Jen; and these adorable ornaments by Lauren Alane. Perhaps if I lost some more of that wretched sanity, all of these things would be mine. Humph. Like I said, sanity isn't always all it's cracked up to be!

The yo-yo's are calling (the fabric kind, sillies ... )

xo,
Meg

Nov 4, 2007

the people have spoken

gnome laptop sleeve 007

Wow! I guess you want a gnome bag pattern? Okey dokey - I'm working on it as we speak. In fact, your response has been so positive that I hope to have the pattern up for sale before Christmas - can it be done? I think so.

gnome laptop sleeve 006

AND, thanks to Joyful Abode's question concerning a laptop fitting in the bag, I've decided to make a matching, padded laptop sleeve as part of the pattern. I'll have to make the sleeve customizable, due to the great variation in laptop dimensions. I love mine - it gives me a wonderful way to cover up that Nascar label that is built into my own laptop (Don't ask - my laptop was a great deal, and we were able to get rid of that loud "engine revving" sound when Windows started up ...)

In other news, I am sick. Again. And I have pinkeye. Woohoo! I think my defenses must be ridiculously low, given the stress of last week. Joy.

The good news? Patrick is making a Chicago-style pizza for dinner. Joy - this time, without the sarcasm. :)

xo,
Meg

Nov 2, 2007

recycled bath mat tutorial


I extend the warmest of welcomes to everyone participating in Sew, Mama, Sew's beyond brilliant November Handmade Holidays series! With no further ado, I present to you:

The Recycled Bath Mat Tutorial
For those looking to add a little color to their family's shower experience

patchwork bath mat


1. Dive into your scrap bag.
Using a card stock 2 1/2 inch square template and tailor's chalk or other water-soluble quilter's pen, trace around your template onto your scrap fabric. Cut out the square. Repeat this 87 times (you will need 88 squares, total.) Be sure to cut out a variety of complimentary fabrics. While making my mat, I stuck with reds, aquas, greens and yellows.

patchwork 017

2. Arrange your patches
First thing's first - clean your floor and ban all fabric-loving felines from entering. You'll need to spread out your patches, 11 across by 8 down, and you wouldn't want your work disturbed once you've found the perfect layout! Once you're satisfied, begin stacking, in order, the top row of 11 patches. Leave the other rows in their place on the floor, and take this "first row stack" over to your sewing machine.

3
. Sew together the patchwork strips.

recycled bath mat tutorial 1

Using a 1/4 in seam allowance, sew the 11 squares together. Press the seams to one side. Return this first strip to your floor layout. Now stack the second row, sew the strip, press, and return. Repeat for the remaining strips.

4. Sew the strips together

patchwork 031

Starting with the top two strips, place the first strip with the right side facing up, then lay the second strip on top of it with its right side facing down. Secure the right, long edge with pins. With a 1/4 in seam allowance, stitch down this long edge and press the seam to one side. Repeat this process with the rest of the strips, always placing the "loose" strip face down on top of the previous strip and sewing along the right, unfinished edge.

5. Embellish the top of the mat
While it is fine to leave the top of the mat embroidery-free, I couldn't help but break out the old-fashioned needle and thread. Here's how I managed the feet outline:

recycled bath mat tutorial 2

I used my own tiny feet as the model, but it would be great to use a child's footsies, or, better yet, the whole family's! Make sure the top of the mat is pressed flat, then trace around the feet using tailor's chalk.

I used the chain stitch with 6 strands of white embroidery floss because I wanted the outline to stand out from the background colors. With three strands of floss, I embroidered "clean feet" using a no-nonsense running stitch.

patchwork bath mat close up

6. Cut out an old terry towel for the mat backing
Cut out part of an old towel to the same dimensions as your mat front.

recycled bath mat tutorial 3

Pin the mat front, right side facing down, to the towel backing.

recycled bath mat tutorial 4

7. Sew the mat front to the towel backing
Using a 1/4 seam allowance, sew around the edges, leaving a 4 inch gap for turning. Turn the mat right side out and press. Topstitch along the entire edge, closing the "turning gap" as you go.

8. "Quilt" around your embroidery

recycled bath mat tutorial 5

Lengthen your stitch length slightly and machine stitch around the outside of your "feet." This serves the dual purpose of accenting the embroidery as well as securing the towel backing to the mat front, to prevent slippage.

That's it! I hope that you or your gift recipient enjoys this light-hearted addition to the bathroom!

xo,
Meg