Mar 29, 2007

A Room (okay, corner) Of My Own

Wouldn't you want to make things all the time if you had a space like this? I can't begin to tell you the impact this little studio has had on my desire and ability to create. I wanted to share with you some photos of the nearly complete space:

My sincere apologies for the coca cola red on the wall. It's the only shade of red that's available here in Creel, Mexico, and it is a vast improvement on the hunter green and dirty pale pink that was there when we moved in last year. It does look a bit better in person.

The studio is equipped with a handmade spool holder (made with an thrift store frame and small nails,) fabric shelves, a fabric covered cork peg board, a handmade sewing machine cover, a hand sewn shoe pocket that I use for storage of projects in progress, and two beautiful wooden chests made right here in Creel.


I also designed a roll-up ironing mat. I hate ironing boards. They are ugly and take up too much space. Here is my fat-cat-sized alternative.
And a hand-sewn straight needle case. The coordinating circular needle case has yet to be made, along with some pouches for holding ribbon and trim.
There are a few obligatory "just because" objects for decoration, like this pointy kitty that I made from a free pattern available for download at Wee Wonderfuls. A goofy picture of my mom, my original sewing muse, is another.


And something very dear - my great-grandmother's button bucket, passed down through the women in my family. Right now it's holding watering indicators in progress, but as soon as my new supply of buttons from Craft Connection arrives, they will have their special spot.


I highly recommend putting together some kind of permanent creative space in your home/apartment. Check out the Flickr group "Craft Rooms" for more inspiration. I spent several weeks researching and planning my ideal space, which is an essential part of the process. Think about what you need in terms of storage, and how easily accessible you need certain items to be, like your sewing machine, and iron. Then think about putting it together within your budget. Hand-make as many items as you can, and take a jaunt down to the thrift store to find other essentials such as buckets, frames, old chairs, etc. The point of a creative space is not to come out with it looking like a Pottery Barn buy. Tailor it to your own needs, budget, space, and style. Once you have a corner of your own, there will be nothing to stop you from unleashing your creative juices!

Mar 28, 2007

Springtime Art/Practical Life Ideas ...

... and a bit of Mexican tradition for you, as well!Did you know that every Easter, in small towns in the south of Mexico , they have a confetti egg fight? My grandfather's family is from the south of Mexico, and it is an Easter tradition we have kept alive in my (now American) family for several generations. Here's a photo of my husband about to get bopped on the head by my uncle - this was way back in college (thus the scanned photo.) Thankfully, he still wanted to marry into my family after this experience!

In his hand, my uncle carries a colorful arsenal ... an eggshell, yolk emptied by making a smallish hole on the skinny side of the ovoid, filled with confetti. Tissue paper and glue cover the hole and keep the confetti inside until it is smashed over someone's head.

The egg fight is so much better than your typical "gringo" Easter egg hunt. Adults hide dozens and dozens of these eggshells, or cascarones, and each child receives a paper bag for gathering as many eggs as they can find before the fight begins. (I use the word "child" liberally here ... my brother is 40, my father 65, and they are more into this than any 7 year-old.) Here's my dad and brother in a typical Easter scene: (click to see a larger version)


Where I am in the north of Mexico cascarones are not part of the Easter celebration. Although we are not going to have a real fight in the classroom, I did put a few materials on the shelf that pertain to the preparation of the cascarones.

Here is my most "active" child totally engrossed in his work washing and drying the eggshells in preparation for decoration. Here he is again, filling, topping, and decorating his eggshell. He ended up making a cat, with ears, tail, whiskers, four paws and all. Too bad I didn't get a picture of the finished product. Perhaps I'll post it tomorrow.
Here is the practical life material you will need for washing eggshells:
We asked the parents to save their eggshells ( not cracked in half, but with a hole in one end.)
Materials:
eggshells
small jar
a small dish (a spice grinder worked here)
a ramekin in which you can submerge an eggshell in water.
sponge
toothbrush
somewhere to put the washed eggs as they dry (you could use a half-dozen egg carton with the top cut off.)
a small bucket to empty the dirty water
organic soap shavings (We also have material on the practical life shelf for grating soap, which is generally used for washing veggies ... this is the same soap that can be available at the Table of Provisions.
small towel for drying eggs
mat or underlay

Presentation:
Put one small spoonful of soap into dish. Fill jar with water and add a small amount of water to the soap dish. Fill the ramekin 3/4 full. Get an eggshell from the basket on the shelf. Show child how to carefully insert a finger in the eggshell, dip toothbrush in soap dish, and wash egg in tiny, circular motions. Once you have scrubbed the entire egg, carefully submerge it in the ramekin. Move around slightly to remove soap, take out of ramekin and let drip until the last drop falls (like pouring water,) and place in the egg carton/holder. Show the child how to clean up. Tell him that when he has filled up the carton, you will show him how to dry off the eggs and place them, one by one, in the basket on the art shelf.

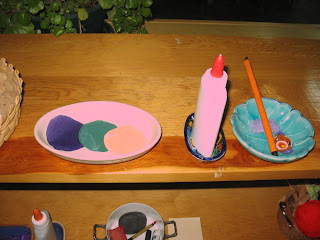
Here's the art shelf. The entire top row is dedicated to egg decorating at this moment. From left to right: cutting confetti, washed eggs, tissue paper for the egg tops, glue, sponge applicator (or paint brush) and small glue dish (you can't use paste for this ... you'll have to make do with white glue,) markers, compartmentalized tray with sequins, packing popcorn cut in half, tissue paper balls, yarn pieces, etc., tray with small pieces of construction paper and a pair of scissors.


This presentation involves cutting confetti (if a small child hasn't chosen this work yet today,) filling the egg half full with confetti, placing glue around the hole, and topping it with a piece of tissue paper. The rest is your creative license - I like to make little animals when I present to an older child, and simple shapes and decoration when presenting to a younger child. I don't present the construction paper and scissors tray to the younger ones - this is for making ears, etc. To make animal ears, cut out the shape and fold 1/4 inch at the bottom of the ear. On this fold you can place the glue and stick it on the egg. The ears stick out and look really cute. I'll post some finished product photos tomorrow to give you some ideas!

Mar 27, 2007

Zakka Pouch = Geometric Solids Storage

Karla just posted a great tutorial on how to make a mystery bag out of a basket base. It just so happened that one of my favorite crafting blogs, www.whipup.net, posted a link to another tutorial for a similar item: the Zakka Pouch at Black Dog Designs. Black Dog posts instructions on how to make a pouch with a knitted base as well as with a basket.
This photo really caught my attention - wouldn't an oblong basket zakka pouch work wonders for the storage of the geometric solids? Especially with a really cool geometric fabric. Plus, you wouldn't need an extra scarf to play the "put-your-hand-in-and-tell-me-what-geometric-solid-you-feel" game, for lack of a better name.

So what is zakka? It's not the first time I've heard the term on the crafting blog circuit, so I checked it out on Wikipedia. Here's what they say:

"Zakka (from the Japanese 'zak-ka' or 'many things') is a fashion and design phenomenon that has spread from Japan throughout Asia. The term refers to everything and anything that improves your home, life and outlook."

I understand that zakka are small, useful items - the little details that make life easier and more interesting. Hmm ... seems to me like Montessori classrooms should be filled with zakka!

Anyway, check out Karla's tutorial and this zakka tutorial. You don't even need a sewing machine, and the crafty skill requirement is really minimal. Look for some snazzy fabric at Superbuzzy or Reprodepot, both of which carry lovely Japanese imports.

Mar 26, 2007

Color Mixing Science Experiment

First, an important update - the cob wall is finished!!! (Well, almost ... we just have to nail on the shingles.) Perhaps now the children will stop asking me: "What happened to your hands?" "Did your cats scratch you?" "What is that cut?" The 3 year olds notice everything. And so much for the keeping my precious, presentation-giving hands nice and neat these past three weeks. They have been cut by pine needles and rocks and are so dry that no lotion can keep them from looking like a dry lake bed. However, it was all worth it. The wall is done, and no more horses can eat our little organic garden!

The first leaves have appeared on the young willow tree in our front yard. The colors were very crisp, even on my clunker of a camera.
And speaking of colors, why not post about a color experiment? This idea came to us by a wonderful woman and Mexican Montessori Matriarch, Olga Dantus.

Materials:
2 white trays, one smaller, one larger
a small glass pitcher
three glasses - here I used two tequila shot glasses and one normal glass.
3 half-ounce droppers with diluted food coloring in each - yellow, blue and red. On the outside of the dropper, indicate the color with coordinating electrical tape.
Print outs of the Color Experiment Word document available for download at the Yahoo Group (join by clicking the purple button to the right.)
colored pencils (children can use the metal inset pencils)
NOT SHOWN:
a small sponge
an underlay/mat to protect the table
SHOWN BUT NOT SUGGESTED FOR THE EXPERIMENT:
a fat, yet interested cat

Masking tape indicates the water level.

The droppers remain on the small tray on the shelf. Pick one of the three droppers and add twenty drops of coloring to the first glass. Return the dropper and pick a second color, adding 20 drops of to the second glass. Fill the small glass pitcher with water and fill these two glasses to the line.

Avoid the chubby, nosy cat. And no, the magnificent pink of these photos was not planned. It was brought to you by my "Clunker of a Camera and it's Magnificent Flash."
Fill in the first 2 glasses on the paper with the appropriate colors. When presenting this part, fill in with the same care we use for the metal insets.

Combine the colors by adding them both to the larger glass.
On the paper, fill in the larger glass with the appropriate color.

Send me some pics and a simple presentation write up if you have some good science experiment ideas up your sleeve.

Mystery Bag Tutorial

Posted by Karla Norgaard: knorgy@earthlink.net


I found this pattern in an old sewing book at the library. I thought it would work well for a mystery bag or a pouch for something in the classroom. It works well because it can stand up on the shelf.

First measure the circumference of your basket. This + 1" will be the width of your fabric. The height of your fabric will be the height of the finished bag + 2 1/2".

Sew the side seam of the pouch with a 1/2" seam allowance.

Fold one end of the tube in toward the wrong side 1/2" and press. Use heavy duty thread doubled on the needle to sew the folded end of the fabric to the top of the basket.


Turn the fabric right side out and press the top edge down into the tube 1/2" and sew. Fold over 1" and press. Sew a seam close to the folded edge.

Stitch over the side seam near the top and bottom edge of the fold, going back and forth several times. Use a seam rippper to rip the side seam between the two stitches you just made.


Use a safety pin to thread a ribbon through the top of the bag. Tie the ends of the ribbon together and cut off the excess. You may need to burn the edges of the ribbon with a lighter to prevent them from unraveling.


Mar 24, 2007

Caring for Plants in the Classroom

I couldn't wait until Easter break to make a rick-rack apron for Tie One On. The rick-rack itself is understated, but the overall effect of the hand-appliqué and three dimensional flowers is awesome in person. Et voila! Thus was born the most nifty "watering flowers" apron this side of the Sierra Madre.
You can make your own similar apron of any style. (This one is a bit complicated with the lining, pleats and all ... I can't even tell you how I did it ... it was pure luck.) All you will need is a bit of Pellon's Wonder Under (found at any fabric store) and this great tutorial for making the flowers, or "yo-yo's."

Iron the Wonder Under to the back side of the fabric you want to appliqué, wait for it to cool, then draw the design for the watering can/pot/leaves. Cut out design, peel off the backing, and iron directly onto the main fabric. Then comes the time consuming part - hand stitch all around each appliqué, using a coordinating thread. I also added some french knots to mimic dripping water. The rick-rack was machine stitched after the rest of the embroidery was completed.
This is (one of) the best parts about this apron - its loop to hold the watering indicators. In my classroom, we use two types of markers ... one that identifies a plant that needs watering (here it is the green with the blue embroidered drop,) and another (here the red flower) that tells the children that this plant has already been watered today. You need to have one of each for each plant in the environment. For example, if you have 10 plants, you would need 10 greens and 10 reds. The indicators that are not in use remain in a pretty vase on the practical life shelf next to the apron and watering can.
In the morning, the guide checks the humidity of the soil in each plant and (most likely) places a green, "water me" indicator in the pot. During the day, the child that chooses to water plants puts on the apron and inserts several red "I've been watered" indicators in the apron loop. The child's hands are then free to carry the watering can.
The child removes the green indicator, wipes off the soil with a small towel, (I'll explain this later) and places it in the loop before watering the plant. After the plant has been watered, she places the red indicator in the soil. She continues in this manner until she has used up her stash of red indicators, at which time she can place the green indicators from her apron loop in the pretty vase. If there are more red indicators left in the vase, she can repeat the process. If not, work for that day is complete, as all of the plants have been watered.
During the presentation, I would show the child that the small (3inx3in) towel that is placed under the watering can spout to prevent dripping is also used to wipe off any soil from the indicator before placing it in the apron loop.

Here are a few more ideas concerning plants in the environment:

1.) Why not label the classroom and garden plants and have this as a classified reading exercise? This could also be done at home in the garden and with potted plants.
2.) Have another material for dusting plant leaves. This might use the same apron as the watering exercise, with a tiny spray bottle/mister (why not use an antique perfume bottle?) and a 3cm x 3cm piece of felt. The presentation is simple - mist a leaf, gently wipe off the dust with the felt.
3.) Another plant care extension is a presentation on how to remove and compost dry, dead plant leaves. The only material required is a small basket in which to place the leaves to transport them to the compost.
4.) Check out the North American Montessori Teacher's Association's (NAMTA) video on the Child in Nature - I have not had the opportunity to see it, but it is highly recommended by my colleague, who says it is an incredible look at how one can set up the outdoor component to the Montessori classroom.
5.) Try to find artistic representations of every plant you have in the environment (e.g. post cards of paintings, collage, pencil drawings, tapestries, fiber art,) and have the children match the art with the real plant.
6.) And an idea from Maria Montessori herself, as found in the Clio series of "The Discovery of the Child," page 75:
"Little pots of fragrant plants can also have a practical interest. A child's activity then consists in searching for, distinguishing, and gathering the plants with different scents. An exercise in distinguishing things that look alike and in seeking out a scent rather than a flower is exacting and affords the satisfaction of discovery."
(Think of having mints and herbs in the environment!)

I'll close this post with some more of Montessori's own words, again from that same chapter in The Discovery of the Child:

"The children never forgot to water the plants with a little watering can. One morning I found them all seated in a circle on the floor around a magnificent red rose that had opened up during the night. They were silent and peaceful, completely absorbed in contemplation."

Mar 21, 2007

Tie One On

We Montessorians are big on aprons. Tired of wearing (or seeing the children wear) the same old apron day after day in your environment? I've found some inspiration at Tie One On - About all things Aprony. The site hosts apron themes, and anyone who is interested can post photos of their homemade apron to the flickr photo gallery.
These photos come from the "mini-me" theme. Other great themes from the past include the pinafore and the smock.
Next month's theme is "rick-rack." I'll be trying to come up with a design over my Easter break. When I went to San Francisco for the Centenary Celebration, I also visited my parents. My mom and I went through her old sewing supplies, and she shooed me away with more rick-rack than any sensible person would ever desire! (Thanks, Mom!) This project will allow me put some of it to use!

Mar 20, 2007

The Five Senses

Definition States for the Five Senses are available for download (Word document at Yahoo, photos at Box.net.) Each card is 14 cm x 14 cm. I cropped the photos to fit, then laminated the cards. You can go to any office supply store and they can bind your control booklet for you.


I love this photo:
And this one:
I am also making available my pictures to go with the Land and Water Forms Definition Stages that are already available at the Yahoo group. I hope you find the real photos more appealing than abstract paper cut-outs!
Okay, I must make myself stop this material making for at least an evening ... it is my birthday, after all! Oh, and a happy vernal equinox to y'all.

Mar 18, 2007

Big News - Music and Photo files available!!!


Over the years, I have collected quite a number of songs from around the world. Those of you who I trained with know that I put together a preliminary set of music organized by continent intended for use much like the continent photo folders. This preliminary set has grown to include music from Oceania, children's music from around the world, and many more songs that are representative of their continent. Today, I am so excited to announce that these music files are now available for you to download here at Box.net! The sets are sufficient for you to compile one to two mix CD's to place in the classroom. Right now, my CD's are displayed in the shown fabric "case," classified by the continent color and an appliquéd cutout of the continent. Within the next few weeks I will put together a tutorial on how to make a similar case for your set.
My students LOVE this work, and it really enriches the study of geography. Soon, they come to hum the songs on their own ... songs that they would have never been exposed to before. Here in Mexico, the children love the songs from Asia and the Middle East. And unlike photos or objects from other countries, songs become the child's OWN, to take with him and recall at any time. Before you know it, a song that at one time seemed different and strange becomes normal and part of one's self. How wonderful would it be for the children of the world to absorb and appreciate each other's music from a tender age, so they are no longer so "different?" And, as we know, it is much easier to hate or declare war on a people we don't know or understand. Music is one important step to understanding other cultures.

In addition, I have posted photos for classified card sets at Box.net. Most of the fruit photos I took myself, while the majority of the vegetables are photos that I downloaded from this free stock photo website. I am also compiling photos to go with the Land and Water Forms Definitions Stages that Karla uploaded to the Montessori By Hand Yahoo group. I also have plans to upload photos for transportation cards and musical instruments when I have the chance. Keep checking back!

Anyone can access and download these files ... you don't need to be a member of the Yahoo group. A permanent link is provided to the right in the sidebar. Once at Box.net, scroll over the file icon and click on the plus sign, which gives you the option to download. You DO NOT need to sign up on Box.net, in fact, I suggest you don't ... you would need to pay $10.

Please let me know what you think, and if you have any suggestions!

Mar 17, 2007

Notes on Fabric

My fabric collection is growing, which means that I have to shrink it by making some more aprons and such. I thought I'd pass along some fabric tips, along with this cheery photo of my laundry line.

1.) Buy your fabric online from Craft Connection. On their website, all of their fabrics are organized by theme, be it transportation, animals, food, or color. Prices are very reasonable, more so than going to Joann's Fabrics or Hancock's, and you save a lot of time.
2.) For a basic child's apron for the Children's House, you will need to order one fat quarter if you line the backside of the apron with muslin or other coordinating cotton. If you will be making a matching mat, order 1/2 total of the fabric. For a set of two reading classification pouches, order 1/2 yard. In short, 1/2 yard should cover you no matter what.
3.) MAKE SURE YOU WASH THE FABRIC BEFORE YOU SEW! This removes the sizing and allows the fabric to shrink. If you don't, you could end up with a bunchy, ugly apron after the first washing. I've made this mistake before. (If you are making language material, this isn't necessary because the pouches won't be washed, especially if you make this version with a cardboard insert.)

Mar 15, 2007

The Name Game

Reading Classification with a twist ...
I've been writing the names of the children on small pieces of paper like I would do for any other "labeling the environment" exercise. However, it's always a bit of a pain ... where to the children put those little pieces of precious paper? In a pocket to get crumpled and forgotten? On the table where it could fall on the floor? Here's the solution, an idea from my head of school, Adriana de la Vega.


I wrote out the name of every child (and teacher) in the environment, laminated them with my Xyron 900, punched a whole in the top, and threaded and tied a thin ribbon to each label. Now, instead of the labels getting lost or forgotten, the child places her name around her neck until the reading child is finished with the work.

This requires a grace and courtesy lesson on how to ask the receiving child if she wishes to wear her name around her neck, and how to gently place the necklace over the head. It's also a wonderful way to introduce capital letters and to expose the non-reading child to meaningful text. I've heard many "My name begins with 'm,' or "Look, Sofia's name has an 'a' in it, too!"

I suggest wrapping the ribbon around the name and tucking it in for secure storage. This is part of the presentation.